Android Native Libraries In Root Context
As usual, I am jumping around from one side project to the next, always looking for the next shiny object. A repeat of a
Broadcom networking bug
on my new HTC One, lead me to want to be able to dig into the underlying network packets. There are a number of pieces to this project that are completely new to me, including building native code libraries (libpcap) and executing code as a root user on-device to allow libpcap to access the low-level networking stack.
Building libpcap
After a lot of false starts, it turned out to be fairly simple to build the native libpcap library. In my original attempts, I was working to build the entire Cyanogenmod ROM for my device so I could harvest the libpcap so file. While this might have eventually worked out, it was a very difficult path. In the end, the “proper” way to do this was to use the Android NDK to build the Android libpcap native code as part of my project.
Running As Root
Libpcap requires root access in order to access the low-level networking stack. On the surface, this seems pretty simple to do using the support provided by the RootTools project . However, it turns out that the combination of root applications and access to native libraries is a bit tricky.
When using RootTools, launching a root application actually involves multiple processes:
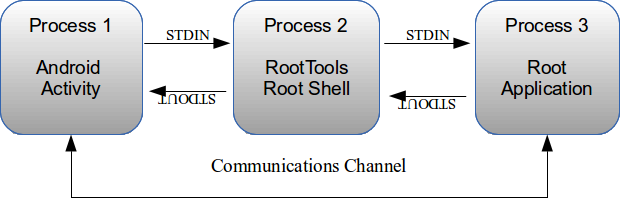
Processes Diagram
The initial process is the main application with an Android Activity. This activity interacts with the RootTools support which checks for root ability and, if found, launches a new shell process with root authority. That root shell mediates between the original Activity and root applications launched on behalf of the original activity. For short-running root applications, it is possible to communicate using the STDIN and STDOUT pipes. However, for a long-running service, it makes more sense to use some other communications channel to communicate between the Android activity and the root application. One possibility would be a Unix domain socket provided by the
android.net.LocalSocket
class.
Native Libraries And Root
While RootTools provides the infrastructure shown above, the problem I ran into was that when launching the root application (process 3), it would not be able to locate the native libraries that the JNI class was dependent on. The RootTools
JavaCommandCapture
class launches the Java class using a command similar to:
dalvikvm -cp /path/to/anbuild.dex com.android.internal.util.WithFramework com.stericson.RootTools.containers.RootClass my.package.RootCodeClass
This long incantation starts up a new Java Application using the Dalvik VM. The WithFramework class
“Binds native framework methods and then invokes a main class with the remaining arguments”
and then calls the
RootClass
class. Finally, the
RootClass
class invokes the
RootCodeClass
constructor passing along the remaining command-line arguments. RootTools expects the root functionality to occur as part of the construction of
RootCodeClass
, however if
RootCodeClass
has a JNI dependency on a native library the functionality will fail with an
UnsatisfiedLinkError
exception.
dalvik.system.BaseDexClassLoader
Normally, Java may be started with the
“java.library.path”
System property to set the location of the native libraries, however that doesn’t appear to work correctly in Android. In addition, the
LD_LIBRARY_PATH
from Linux won’t work either. It turns out that Android actually pulls the native library path from the Classloader that is used to load the class referring to the native static library.
The
dalvik.system.BaseDexClassLoader
class acts as both a Java class loader mechanism and a holder of the native library path. The initial classloader started by the Dalvik VM does not contain any references to the static library path leading to the linkage failures. I was able to solve this, by adding yet another layer of indirection:
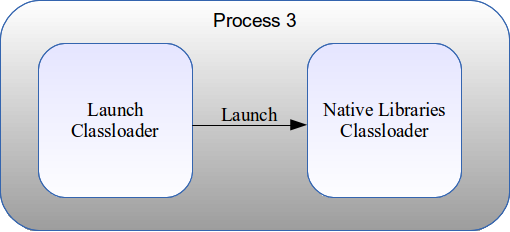
Classloader Diagram
In this model, the initial
RootCodeClass
constructor creates a new
BaseDexClassLoader
instance referencing the native libraries path.
JavaRootClassloader targetLoader = new JavaRootClassloader(
				nativeClasspath,
				null,
				nativeLibPath,
				getClass().getClassLoader());
In this case, the native classpath and native libraries have been passed in as command-line arguments from the originating Activity. The targetLoader must be used to load the target class in order for the target JNI classes to use the provided native libraries. It is important that these classes be kept in separate classloaders to avoid errors in the Dalvik VM about redefinition of classes.
Class<?>targetClass = targetLoader.loadTargetClass(targetClassName);
The loadTargetClass method is a special Classloader method that uses classloader-first rather than parent-first lookup to avoid using the parent classloader which does not have the native library path defined.
/**
	 * Load the specified class, making sure to *not* do a parent-first load
	 * as we will end up with the wrong classloader.
	 *
	 * @param targetClassName
	 * @return
	 * @throws ClassNotFoundException
	 */
	public Class<?> loadTargetClass(String targetClassName)
		throws ClassNotFoundException
	{
        Class<?> clazz = findLoadedClass(targetClassName);

        if (clazz == null) {
        	// Look locally first for our target class
        	clazz = findClass(targetClassName);
        }

        return clazz;
	}
In the current implementation, all of the information necessary to launch the final targetted class with native library path properly set is provided by the originating Activity. Remaining command-line arguments are captured by the “launcher” class and provided as the arguments to the main method of the target class.
DEX Files
The default RootTools approach for creating Java classes that can be loaded in the root context is by adding the
com.stericson.RootTools.containers.RootClass.Candidate
annotation to the root classes and then processing with the
com.stericson.RootTools.containers.RootClass
class. The result of this process it to create an Android DEX file called
anbuild.dex
. I struggled to get this all to play nicely and get all of the proper classes into the proper DEX files. As mentioned, loading the same class in different classloaders can cause Dalvik VM errors that look like the following:
Class ref in pre-verified class resolved to unexpected implementation
In the end, I ended up with three separate DEX files:
-
Standard application DEX file
This file is automatically built and handled by the Android tools and the runtime. This file contains the code for the main Activity and associated logic -
Root Launcher DEX file
This file contains just necessary classes to be loaded by RootTools and to create the special Classloader instance that can load the real root functionality while specifying the native libraries path. This DEX file is generated as rootlauncher.dex into the res/raw folder -
Root functionality DEX file
This DEX file contains the Java functionality that will run in a root context that will have access to the native libraries necessary to interact with the system. This DEX file is generated as root.dex into the res/raw folder
Building The DEX Files
Because of this added complexity in creating the multiple DEX files, I had to take more control over the build process. Taking advantage of Eclipse’s ability to call out to an Ant build.xml as part of the build process. For instance, the build.xml file for generating the DEX files would look something like:
    <target name="build_root_dexs">
    	<property name="dx.path" value="${user.home}/software/unzipped/android-sdk-macosx-personal/build-tools/${build-tools-version}/dx" />

    	<!-- Build the root launcher -->
    	<unzip src="libs/RootTools-3.3.jar" dest="bin/classes-launcher">
    		<patternset>
    			<include name="com/stericson/RootTools/containers/*.class"/>
    		</patternset>
    	</unzip>

    	<echo message="Building rootlauncher.dex" />
    	<exec executable="${dx.path}">
    		<arg value="--dex" />
    		<arg value="--output=res/raw/rootlauncher.dex" />
    		<arg value="--positions=lines" />
    		<arg value="bin/classes-launcher" />
    	</exec>

    	<!-- Build the code that will run within the root container -->
    	<echo message="Building root.dex" />
    	<exec executable="${dx.path}">
    		<arg value="--dex" />
    		<arg value="--output=res/raw/root.dex" />
    		<arg value="--positions=lines" />
    		<arg value="bin/classes-root" />
    	</exec>
  </target>
An Ant build can be added to the build file via the Project properties:
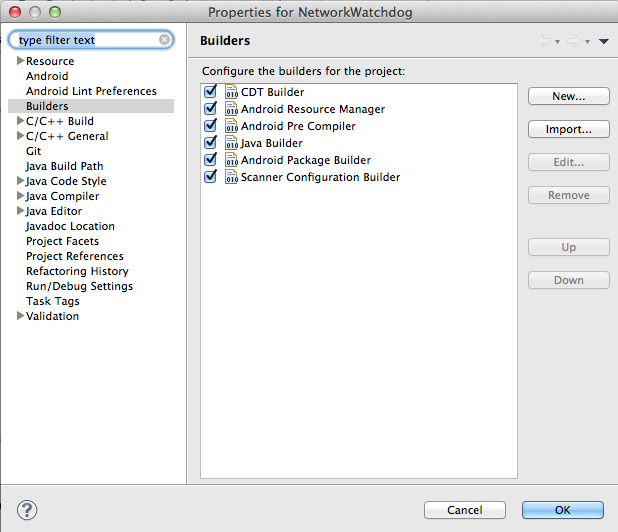
Eclipse Builders
Add a new Ant Builder:

Eclipse Builder Type
Choose your Ant file:
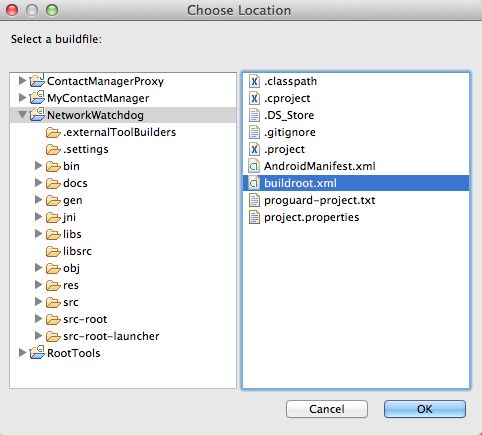
Ant Build File
And save the resulting build launch configuration:
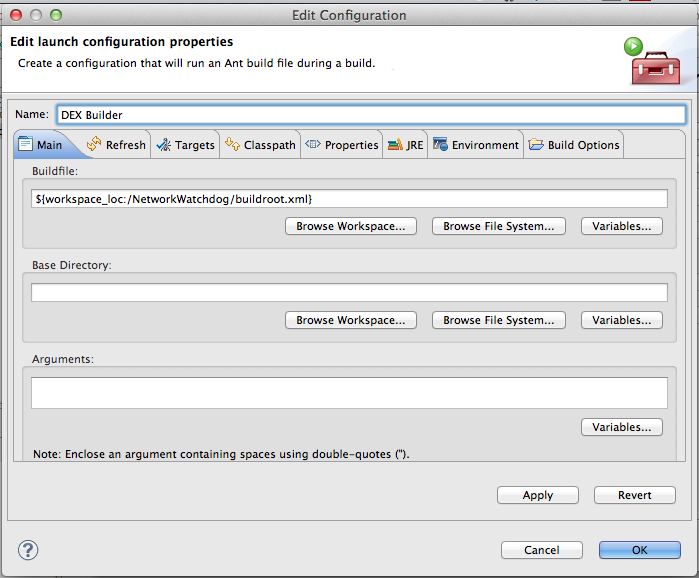
Build Configuration
Caveats
While this approach is working fine for Android 4.0+, there are a lot of pieces of this puzzle that are private/internal to the Android implementation. For that reason, many of these internals have the chance of changing over time. In particular:
-
The
com.android.internal.util.WithFrameworkis clearly marked as an internal class -
The
dalvik.system.BaseDexClassLoaderis yet another internal class that may disappear or change - Even the Dalvik VM will likely go away in the future and be replaced by the new Android ART runtime