Debugging Titanium Android Native Modules
Recently, I’ve been playing a bit with the Appcelerator Titanium Platform . In particular, I’ve been working on a native Android module for Titanium . In their documentation, they state :
The best way to debug your Android modules right now is a bit old fashioned. When there is a problem or unexpected behavior in your module, use log statements to trace through your code’s execution.
However, the functionality I was working on was complicated enough that I needed the comfort of Eclipse step-debugging to truly feel like I was able to see what was going on inside my code. With that in mind, I dug around and figured out a way to debug these native modules and discovered some cool functionality in the
Android Debug Bridge (adb)
that I was previously unaware of.
Native Module Creation
The module creation and implementation steps are no different than the standard steps documented by Appcelerator . Once that is complete and it is time to do some debugging, I found the following to work to allow for step-wise debugging of the module. (NOTE: This has only been attempted on-device, although I expect it should work on top of the Android emulator).
Setting Up Module Debugging
After making testable changes, execute the “install” target of the build.xml file for your module to get the module properly installed on the device . At this point, it is necessary to enable debugging of your module’s example application if it has not already been handled via the Android manifest file. The basic command looks like:
adb shell am set-debug-app -w –persistent my.package.name
Where the two options can be used dependent on your needs:
-
-w
Wait for debugger at start. Use this if you need to debug something that starts early in the module’s startup routines -
–persistent
Remember that this application should be debuggable across reinstalls.
With a debuggable application, it is actually possible to use the application’s process identifier to connect up a local port to the application’s JDWP agent. For instance, if you look at the output of “ps” from the shell, you will see something like the following:
USER PID PPID VSIZE RSS WCHAN PC NAME
…..
u0_a48 1471 795 215984 29516 ffffffff b7e62157 S com.seterasoft.sync.scheduler
…..
With this knowledge, adb can be used to forward host traffic from TCP port 9999 to the JDWP agent for this particular process using this command:
adb forward tcp:9999 jdwp:1471
Given my infinite laziness, I prefer to do this linkage with a script to avoid manual steps as much as possible. Thus, I created this simple Groovy script to query for “my.package.name” and link it to local TCP port 9999.
#!/usr/bin/env groovy

def ps = "adb shell ps".execute().text
def reader = new StringReader(ps)

def found = false
reader.eachLine { line ->
    if (line =~ /my\.package\.name/) {
    	found = true
        def pid = line.split()[1]
        println "Forwarding tcp:9999 => jdwp:${pid}"
        println "adb forward tcp:9999 jdwp:${pid}".execute().text
    }
}

if (!found) {
	println "Did not find application process.  Is it running?"
}
It is important to understand that this linkage must be re-established each time that the application is rebuilt and/or redeployed. This will result in a new process being started and a new ADB forward must then be configured.
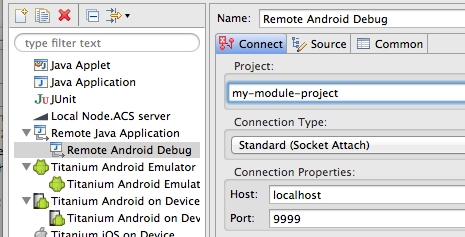
Debug with Eclipse Remote Debugger
With debugging enabled for the application and a JDWP forwarding set up via ADB, it is just a matter of using the standard Eclipse remote debugging configuration. Assuming the previously documented forwarding set up, Eclipse remote debugging can be configured to debug via local port 9999 and ADB will proxy those requests to the running (or waiting) application.
While this requires a bit more setup than some standard debugging and only works for Android, I’ve still found it well worth the time and effort while working on native modules for Android in Titanium.